Showing posts with label bracelet. Show all posts

Friday, 18 November 2016

One Amber Bracelet equals One Amber Bracelet and One Amber Pendant

I get a little nervous when someone asks me to adjust an item of their jewellery. Perhaps not quite as nervous as I get if some asks me to mend some jewellery, but still nervous. You only seem to get asked for help with items that mean a lot to the owner and non-jewellery makers, understandably, don't know any of the potential horrors that came come with trying to turn one size of jewellery into another...

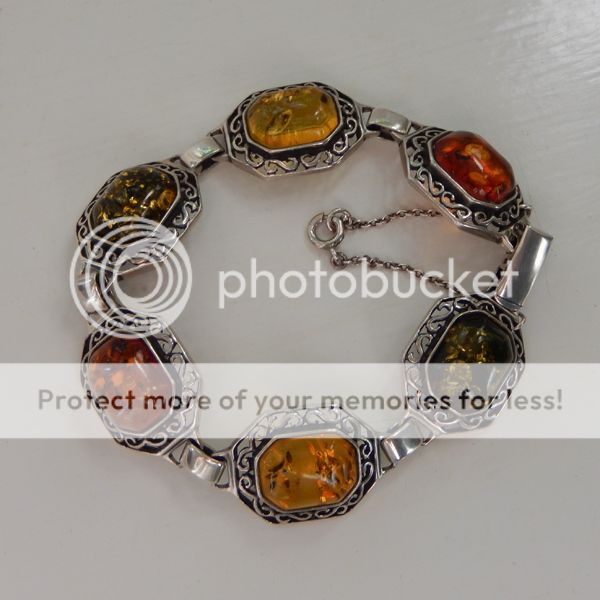
Amber bracelet

I was asked to adjust a bracelet that was so large that the owner, despite loving the piece, was just unable to wear it without fearing she'd lose it. I said I'd look at it but made it clear that if I didn't think I could do the adjustment safely then I wouldn't do it at all. Given the bracelet in question was set with stones, and amber ones at that (an incredibly soft stone as I mentioned in this post), I felt justified in my apprehension.

On being given the bracelet and sitting down with it, doing some thinking and doodling some ideas, I came to the conclusion that I was able to do what I was asked, and that was not only make the bracelet smaller but also make a pendant out of the stone-set link that I would be removing.
Despite my anxieties when I actually picked up my pliers and piercing saw I was surprised, and pleased, at how easy (relatively speaking) adjusting the bracelet and making the pendant turned out to be.

Audible sigh of relief.
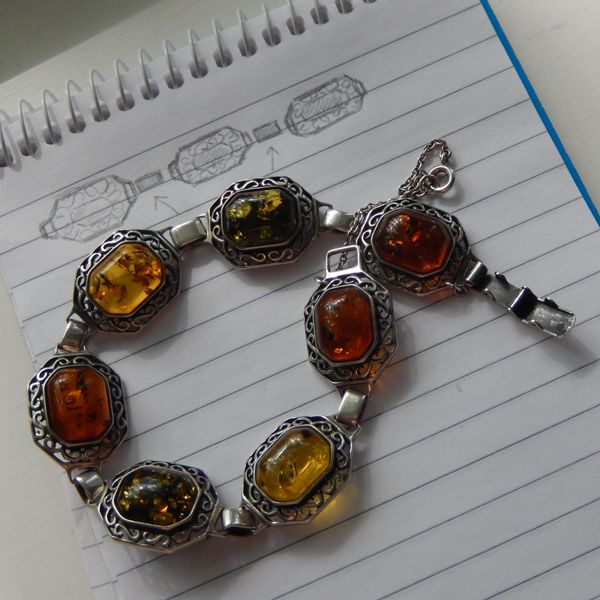
Amber bracelet and jewellery illustration

My initial plan had been to cut through two of the connecting links, as shown in my illustration in the photo above, but on looking more closely I realised the clasp hadn't been soldered on and so I was able to prise it apart from the bracelet. I then cut through a connecting link and removed that and the stone-set link next to it. The clasp was then reattached to the bracelet which was now one silver connecting link and one amber stone-set link smaller.

When it came to making the pendant I decided against attempting to resolder the connecting link that had been cut through. A little research showed me it would probably be an error to trust to heat protecting compounds to protect amber from a soldering torch, and the general advice was that the best option in this situation is to remove the stone from its setting, perform the soldering, and then reset the stone. As I hadn't set the stone in the first place I did not want to do this, especially as, like I said earlier, amber is such a soft stone and could easily be damaged both in removing it from the setting and when putting it back in. The connecting link is made from thick, work-hardened silver and I felt confident that it would securely hold the pendant on the necklace.
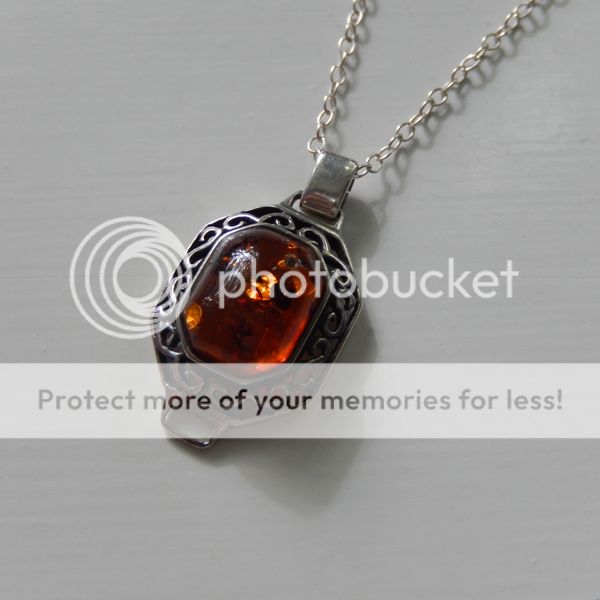
Amber pendant

I also decided against removing the extra 'loop' of silver that had connected the stone-set link when it when it was within the bracelet. This was mainly so that if the new size bracelet didn't fit (which was a concern as the stone-set links were quite large so the adjustment was kind of all or nothing) then it could be put back together again and a different option sought.

Despite my initial concerns at the request, I was pleased with how the adjustment went. And the owner of the jewellery? Well, the bracelet now fits perfectly and they have a matching pendant to boot.

Wednesday, 26 August 2015

An Endlessly Charming Bracelet...

When I started making jewellery, I stopped buying jewellery. It seemed the right thing to do, even if I was turning down something that I couldn't actually make myself. I mean, how much jewellery does one person need that they can afford to be fussy about what type it is? I made jewellery with silver so surely not indulging in a beaded bracelet (that I might learn how to make one day (and I have done so)) wouldn't be denying myself too much. Over time I've relaxed about this a little, letting myself enjoy jewellery that I haven't made, can't make, or probably won't ever learn how to make. This has helped my family at Christmastime no end... And while I have a soft spot for artisan made pieces, I am not beyond seeing the good points in a machine-cut ring from a high street shop, ever so occasionally...

So on receiving an email from Endless Jewelry asking me to review some of their jewellery, I hesitated at first. My blog is about  hand-crafted jewellery, mostly designed by individual makers, often in their spare room. Endless Jewelry is made by a large company, perhaps involving some expensive machinery, most probably not by the designer, and also had a promotional campaign fronted by Jennifer Lopez. Not so much in common really...

Endless Jewelry Bracelet in packaging

But a love of jewellery is a love of jewellery and  curiosity got the better of me, so I said 'yes'. I was told I would be sent a bracelet, and I was asked for the size and colour I would like it in. I chose 36cm (double-length that wraps twice around the wrist) and grey. Well, the grey looked like silver so what else could I choose really.

Parcelled up, all the way from Germany, came a nicely designed box finished with coloured elastic ribbons. Inside was a jewellery stand and the bracelet itself. The first thing I noticed was that the attention to detail in the packaging was carried through into the jewellery also. The bracelet consists of a piece of leather, sewed to make a tube, and finished at both ends with a magnetic clasp. Threaded onto the leather tube was a small silver charm, in the shape of a four-leaved clover. The leather bracelet itself is well made, carefully finished with no loose threads, and the clasp is strong and seems reliable. The Stirling silver four-leaf clover is small, sweet and charming and  while most likely made by casting is, again, nicely finished.

The only issue I found with the bracelet is that it's a little too snug fitting - despite having skinny wrists my feeling is that this size is either suitable for models or children. One of the downsides of ordering online, affecting any jewellery who sells in that space, is that people don't have an opportunity to try things on. Less of an issue with necklaces and earrings, but quite awkward with bracelets (as in this case) and rings especially.

Endless Jewelry Bracelet in packaging

Sizing issues aside the bracelet is very wearable, casual enough for any time, and dressy enough for an evening out. The selling point of this jewellery is a little along the Pandora charm idea, where you can add silver charms, or gemstone or enamel beads to your collection (and store them on your stand) to personalise your leather bracelet, and even make it different every time you wear it, should you wish (and have time!).  It's a nice touch that would allow people to buy charms for you in the way they can with Pandora charms, and also with the charms you add to a simple chain bracelet.

I can imagine this bracelet being very popular, especially around Christmas and Valentine's Day. It's simple but has style and its flexibility of design means it can literally suit anyone. The quality and detail of the jewellery, the packaging and the idea behind it all are all sound. Yes, it's not hand-made but should you wish to indulge in something a little more 'off-the-peg', but with the opportunity for an individual streak, then I can recommend this style of bracelet and charms. All I would say is, especially if you're buying for someone else, be careful with the sizes.

~~

Please note, the jewellery in this post has been provided to me for free from Endless Jewelry in return for a review. My views are always my own and my reviews are always honest.

Thursday, 7 May 2015

Holiday by Bracelet - 'Jewellery Maker' Kit

You know the saying, a change is as good as a holiday? That was part of my reason for deciding to try a jewellery making kit. I‘d not used one before, so the idea of indulging in some pre-prepared creativity was appealing. When I began making jewellery it was as part of a silver-smithing course, where the emphasis was on using the metal in ways that didn’t necessarily mean crafting jewellery. In essence, I began making jewellery as a side effect of working with silver. And every now and then, something simpler, not involving hammers and a soldering torch, makes a nice change...

Also, by way of a coincidence, a friend of mine has recently asked me for some advice on jewellery kits as she wants to start creating but is bewildered by the choices available. A lot of people seem to start making jewellery through kits, little collections of (nearly) everything you need that result in a finished piece of gorgeousness that you can also wear. It’s a good place to start and ideal if you want to experiment before committing to buying packets of beads, rolls of wire, and heaps of tools.

Bracelet Kit

So with the idea of a 'holiday' for me, and a bit of research for a good friend, I took up a kind offer by Jewellery Maker to try one of their kits.

The jewellery kit arrived swiftly in the post, well packaged in a jiffy bag and bubble wrap, around a strong cardboard box that contained instructions and ever component of the bracelet I was going to make, carefully separated into tiny plastic pouches. A simple instruction leaflet was included. The bracelet itself, made from silver plated copper, was sturdy and easy to put on and remove, and had an intriguing one-and-a-half wrap design, separated with jump rings - see photos to understand exactly what I mean here. While I used the image on the box as inspiration, it would have been possible to use any of the different parts of the bracelet, or all of them, to fix the gemstones onto; this is a nice touch, the ability to customise and personalise a kit.

Along with the bracelet came a bag of silver plated jump rings, which were used to attach the gemstones, all carefully separated into different bags for the different gems; moonstone, peridot, amethyst and iolite - a great selection of colours that complemented each other beautifully. Every bead was already on a head pin, looped at the top so it could be fixed to the bracelet itself with a jump ring.

Bracelet Kit

Please note that if you are a beginner then this kit, and I suspect many (if not all) others, assume that you have some basic tools like snips and pliers. This particular kit needs a couple of pairs of pliers to open and close the jump rings, and I found a small round-nosed pair handy for straightening some of the loops on the head pins as well. The only downside of the kit was here - a few of the headpin loops were a little too small to fit a jump ring through, and while most of them were easy enough to adjust with the round nose pliers and then use, a couple remained just that bit too small - these were on the smallest beads as well, so I guess that was why. It certainly didn’t detract from the overall effect of the bracelet when finished though, and only added a fine layer of frustration when constructing it - and I could have removed the supplied head pins and added my own to make the beads work.

I found the kit fun to make; mixing the different colours of the beads to suit myself, and slowly attaching them to the bangle was a fun way to spend an afternoon on a rainy weekend. The end result is pretty, full of colour and sparkle, and fun to wear.

If you’re an advanced jewellery maker, then you may find this kit a little too simple - although it is very effective. If you’re only just starting out then the kit couldn’t fail to inspire you when you see what you can make, and how easily. It should encourage you to carry on creating.

~~

Please note - I was given the jewellery kit in return for a blog post about it, but my views are my own and have been given honestly.

Thursday, 25 August 2011

Green leaves . . .

I love fluorite gemstones (both green and purple) and these chips are some of many I've enjoyed using with silver.


Incorportaing these into this bracelet with the little silver leaves just seemed a perfect way to use the beads and I'm really pleased with the outcome (hence the devotion of an entire blog post to the bracelet).


Wednesday, 19 August 2009

Green silver?

And I don't mean ecologically sound.

I've heard about jewellery turning your skin green, never meant to be an indicator of high quality metal, but I've not come across jewellery itself turning green before.

This is what's happened to a bracelet I made a couple of years ago.


I've given it a bit of a clean up with a silver-polish impregnated cloth but the greenish tinge still remains. Next I'm going to do some more heavy-duty cleaning which will at least clean up some of the oxidisation.

The core of the bracelet is silver wire, with finer silver wire wrapped around it, and the ends are 9ct gold hollow beads. All I can think is the solder used to fix the beads and the finer wire to the main bracelet was low quality and this has caused the green to appear.

Any other ideas anyone?

Saturday, 15 August 2009

Saturday Folksy Listing Frenzy

Well, okay, it's only seven items but it seemed to take an age, as I sat in front of the computer with a tape measure and a clutch of necklaces and bracelets and a big, big mug of coffee.

Here's some photos (yes, taken on my old camera), but not of the big mug of coffee . . .


Click on the pic to go to the item in my shop if you fancy seeing more photos.

Saturday, 25 July 2009

Listing . . .

I've listed some more items in my shop on Folksy. Always seems to take forever and is always a bit frustrating being away from making, but the finished pages do look quite nice, if I say so myself!