Sunday 23 December 2012

Inspiration - Winter

November and December have brought a lot of rain and a few frosty days. Christmas shopping has been hard, but it's done and (most) gifts are wrapped. I'm trying, now, to enjoy a little of that Christmas feeling, trying not to miss it in the rush and bustle and things-to-do chaos that can easily descend at this time.
  
Here's some photos I've taken in the last couple of months.


Hope you've enjoyed the chaos and cold a little this winter!
Merry Christmas and a Happy New Year to all my readers and fellow bloggers!

Wednesday 19 December 2012

The Jewelled Web ii


If you're ever stuck for a way to display your jewellery, this is something to try out, and also doubles up as a bit of wall decoration too...

The vintage (antique) pendant in this post is simply beautiful. The Past Era Blog has gone a bit quiet of late but has heaps of archives to delve into.

Free silversmithing jewellery ebook (sign-up required).

The Huffington Post has a few ideas on making jewellery from things that other people may overlook.

In my never-ending quest to take better jewellery photographs, I found this article, with a great set-up for a light box.

Utterly beautiful beads.

Full of helpful links, a feature about selling on Etsy (much of it relevant to Folksy and selling online generally).

and on a non-jewelery theme...

Last minute gift crisis? You should find something to make here...

And a discussion about Instagram's new policy ideas. Interesting reading.


Hope you're lead-up-to-Christmas-week is a good one.

Tuesday 11 December 2012

Jewellery Book Wish List

I adore jewellery books. Some I feast on for inspiration and rapidly discard. Others are referred to again and again, both for inspiration and information. Despite a heaving bookshelf, when Christmas comes around and people ask me what I'd like, I always find myself trawling bookshops, both on the high street and online, browsing for the latest, the oldest, and hopefully the best.

Here's a few books I'd like to find in my Christmas stocking this year.


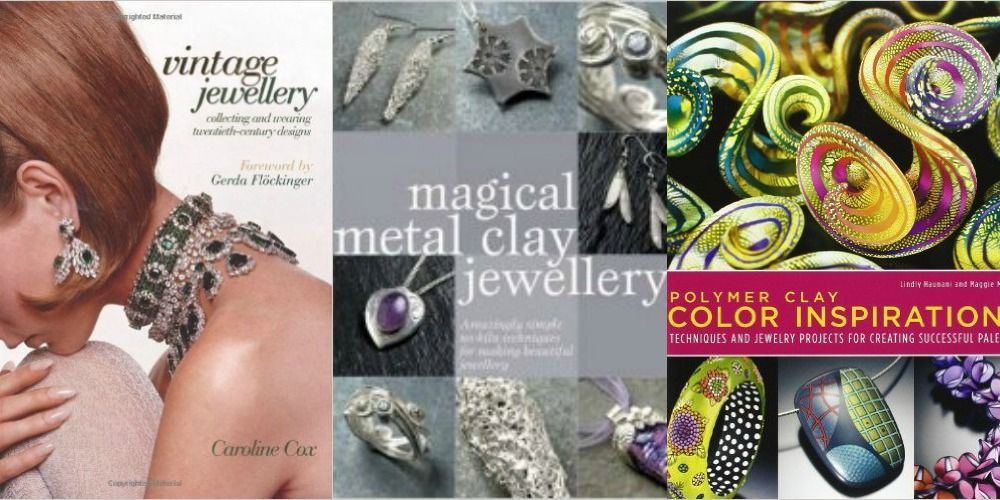
three jewellery book covers

I've given Vintage Jewellery by Caroline Cox, a few, long, lingering glances in the book shop. Beautifully produced, full of inspiring images. If this doesn't make you want to get making, then nothing will...

I have no kiln. The title of Magical Metal Clay Jewellery: Amazingly Simple No-Kiln Techniques for Making Beautiful Jewellery (written by Sue Heaser) says I don't need one to make metal clay jewellery. What more could you ask for?

The sheer vibrancy of the polymer clay colours used on the front cover of Polymer Clay Color Inspirations by Lindly Haunani and Magie Maggio just make me want to know more about what's inside. Cover image is very important.


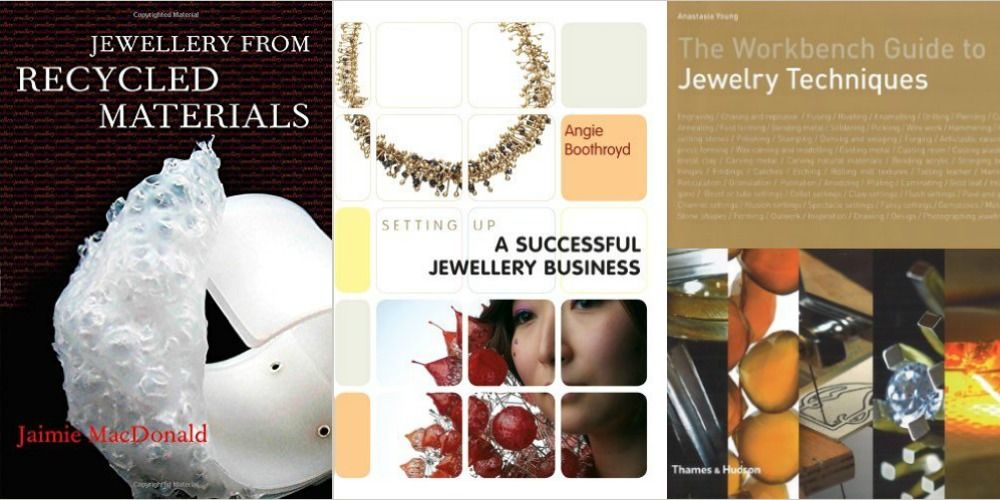
three jewellery book covers

This book looks fascinating. Jewellery from Recycled Materials by Jaimie MacDonald, looks wonderfully inventive, and that is always inspiring. Ideas for jewellery from everyday objects, things you'd otherwise throw away, must be worth a read.

Setting Up a Successful Jewellery Business (Setting Up Guides) by Angie Boothroyd, is a title to strike a chord with anyone who tries to sell on Folksy, Etsy, or another other craft-based online outlet. This book looks comprehensive and, unusually for this topic, seems aimed at a UK audience. (For my review of this book, after reading it, click here)

The Workbench Guide to Jewelry Techniques by Anastasia Young has been out a couple of years but has, until now, escaped my jewellery-book-radar. It looks detailed. It looks wide-ranging. It looks just about right. It's also a silversmithing book, pure and simple, and I just adore those.


Please leave details of any books on your Christmas list this year. I fear they will only make my list grow longer, but I'm always on the lookout for new books to desire...

I've not included any ebooks. My Kindle is greyscale and, from the samples I've downloaded images, and instructions containing images, just don't work. For those of you with full colour eReaders suitable for such books, do share how well they work for you. I'd love to know.

Hope you like my choices and that something here inspires you too.

(Please note, this post contains affiliate links - see my about page for more info on my early adventures in affiliates :)

Saturday 8 December 2012

The Jewelled Web


The run up to Christmas is always a busy time, and feels more hectic than ever, for me at least, this year. As much as a boon for shopping the internet is, it's also a massive distraction. But surfing around does have its compensations, not least a bit of down-time and on my virtual travels this last week or two, I've found some goodies. I thought I'd share them here.


A thoughtful post about finding balance by Silverpebble. Twitter or blog? I prefer blogs too...

Bracelet of the week, on Folksy.

Need inspiring photographs of vintage jewellery? Look no further.

How to wear all your rings at once. I approve.

A blast from the past on Folksy about making jewellery with wire.

Heard on Radio 4's Midweek show (listen again here), world renowned silversmith Jocelyn Burton talking about inspiration, metal, and training as a silversmith in less enlightened time (she's on first so listen from the start). Find her own website here for sumptuous examples of her work. (Download 5th December podcast here.)

And something with no connection to jewellery in any way whatsoever... a 'Where's Wally' but with photos and a very sweet dog ...


Hope you enjoy. Have you found any interesting links recently?

Wednesday 5 December 2012

My purple notebook of Ideas

For several years now (slightly over three of them, to be more precise), I have used a special tool when I make jewellery. I use this very tool every time I sit down with silver to hand, and it sits on the table alongside soldering torch and piercing saw, pliers and snips.

It's an A5 purple notebook, not an expensive one, and not even a particularly nice one. If I'd known it would be with me so long, and become so important to me, then I suspect I would have chosen something a little more special to look at. But it's a hardback, its cover is wipe clean and that's always handy in the workroom, and the purple colour is distinctive enough that I can normally find it amongst heaps of emery paper, or under plastic bags half-filled with silver off-cuts and dust.

For many years when I started making jewellery, I winged it. I always promised myself I'd make notes, jot ideas down, make sure I knew what I used to get which effect, both to replicate successes, and to avoid repeating disasters. I just didn't get round to it until the purple notebook came along.

Very rarely now do I not use it when I work. If I don't use it at the time, I fill it in later. I add the date, draw some truly amateurish sketches of ideas that I'm going to try, annotating them when they don't work out, or adding details such as trying a different wire gauge, or a different length of silver. I draw little images of things that have worked, sometimes using a shorthand of a big tick next to them. As my writing is normally an illegible scrawl, a large tick by a familiar looking design is a great shorthand when I'm flicking through, trying to find just the right 'ingredients' of silver and skills that I need to recreate a particular style.


And I have found this invaluable time and again, to have a written note of things that work, as much as things that don't. If several weeks or months have passed between me 'perfecting' (as much as you ever can) a new idea and then trying it again, it saves an afternoon of frustration if I know exactly what I need to do, rather than having to make some educated guesses, and then find they're not as intelligent as I thought they were.


The notebook is equally as handy for jotting down inspiration for designs as they come to me. Working with silver can easily spark new inspiration for how to use it (often in the middle of something else, when it's inconvenient to take that inspiration any further). But a small note in that old purple book means I can return to that same idea, expand upon it, and add the same positives and negatives that inevitably arise as I attempt to turn a flat, pencil sketch into a living piece of jewellery.

I do regret, very slightly, not using a spiral bound book, something that would lay open on the table easily, but that aside, I'm more than happy with what has become so important to me. In both front and back, receipts and invoices are tucked away, along with a few dried leaves, kept for inspiration and memory.


Whilst it's not a tool in the conventional sense, in terms of making jewellery, it's one I'd recommend anyone interested in designing, in any type of craft, to invest in. You don't have to keep it with you all the time, although it might be worth having a small notebook around for that purpose, but it is worth having some kind of record of your ideas, your failures, and your successes  - and how you achieved them.

Does anyone else have a notebook that's also a time and lifesaver? Links to similar posts are most welcome!


PS. If you read the comments you'll notice that Vic said she was going to do her own notebook post - and she did! Do check it out.

Wednesday 14 November 2012

Copper wire brooches

As often happens, a birthday crept up on me at short notice (how do they do that?) and I wanted something quick to make and give, that looked good, and was practical.


I called upon my stash of copper wire, much of it still only half-stripped after being pulled from the house during rewiring, and did some hunting in books and much searching on the net for inspiration (as well as some gazing out of the window aimlessly).

I came across the idea of creating a brooch from one piece of wire, no soldering, just some planishing, some filing, and lots of bending. Yippee.

I was not overwhelmed by my first attempt -


But preferred the second brooch I made, finding the catch more organically a part of the design, and the curves more pleasing to the eye.


I got quite a kick out of creating something that, it turns out, is going to be worn on a winter jacket for the next few months, something bold and striking, that took some planning and a bit of strength (wire is always less bendy than you think, especially if you go the wrong way and need to re-bend...), and which made someone smile when they tore off the wrapping paper.

I'm even starting to look forward to winter evenings now, curving that wire and creating bright jewellery.

Tuesday 6 November 2012

Inspiration - Autumn

September merged into October, and suddenly it's November and officially autumn and cold enough to be winter. Here's a few photos I took through September and October, things that caught my eye and inspired me, made my heart sing a little, and made me laugh.

Click on the images to see them larger and in a slideshow -  it's a little slow to load, mind.


Beach seen through sea defences sand worm traces sand advertising water marks on sand rose petals alpine strawberry web in dew against hydrangea leaves stunning cloud against stunning sky carved pumpkins by the sea


Hope you enjoyed your late summer early autumn months too.

Saturday 27 October 2012

How to Photograph Handmade Jewellery - part 3

Previously I've covered some of the basics of photographing jewellery, and how to light shots. This time I'm going to look at how location choice can save you work and time, and how creating themes for your jewellery can improve the look of the final images.


Location, location, location


A perfectly crafted piece of jewellery deserves to look its best, and so the setting up of photos is a crucial part of the process. Once you have found how to design your photos in a way that you’re happy with, then you’re well on your way to having a photography process or workflow which will enable you to whizz through jewellery photo sessions.

First, try and find a suitable place to take your photos. If you’re lucky enough to be able to leave your photography set-up in place then I envy you! Chances are you’ll need to have somewhere to store all the different elements you’ll need for each session, so try and keep them together and close to the place you’ll take your photos.

Of course, these are hints designed to make things a little easier, and most definitely not rules. If you fancy using a different spot each time you take photos then go right ahead. However, if you prefer to use one particular location then spend some time taking photos in a variety of places, for example on a well-lit table or, my personal favourite, on a window sill, until you find the best situation for you. Some people take photos outside and that can work well if you can rely on it not raining (not so tricky in the UK for much of the year ...).


Dream on a theme


Creating themes for your photographs is an ideal way of also creating continuity in your work, and a unified look for your shopfront and gallery images.

Theming your photos can be simple or complicated. I try to keep it simple by often positioning my jewellery on one or more large stones. (I have a small collection, created for this purpose.) Their rough surface contrasts with the shine of the silver, and I like the subtle colours that (I hope) don’t detract from the jewellery. My theme is the difference of unrefined natural stone with the refined silver and gemstones I use. This reflects some of the natural and organic aspects I try and integrate into my work.


I also use wood as a prop and find, again, the contrast between natural and polished surface a good contrast (see image further down page).

Some craftspeople create collections of jewellery and style themes for each collection. For example, I often use hearts in my work, and so I could, if I chose, photograph all my heart inspired jewellery on a red background, to indicate love and romance. I also create quite a few leaf designs, and so I could chose to always photograph these on the open pages of a vintage book on nature.

However, I chose not to do this for reasons of simplicity but it is a valid choice to make, and many people use the idea of theming their work to add interest to their photographs, and to create a brand identity. But that’s getting into the field of marketing and we’re just dealing with photography here.

Another alternative is to let your imagination run riot with each individual piece of jewellery you create, especially if you’re creating highly detailed and intricate works of art. If something has taken you many hours to make then don’t let it down at the last by failing to invest time and imagination into the presentation. A careful photographic study of a piece of jewellery can only enhance it.


Backgrounds


Often the simplest background is best, and the simplest choice for jewellery is a white background. This can be card or paper, or even cloth (although beware of tiny fabric threads on your work when taking close-up shots).

From personal experience I've found that black is a poor choice for a background colour. I experimented with this once and the high shine of the silver blurred against the black, and even seemed to bleed onto it. It was a disaster.

Silver photographed on a black background. Not good.

Silver photographed on stone. Rather better.


I sometimes see black backgrounds used in professional photo shoots for jewellery, but I think it takes far more equipment and know-how to make that type of high contrast photography work than I possess of either. My advice is, if you're looking to keep things simple, to steer clear of black backgrounds.


Following on from the principal of theming your photos, it can also be effective to be adventurous when choosing a background to place your work on. I use stones, as I’ve said, but some people use slate, leaves, or other natural items that contain texture. I've used pine cones on occasion, quite successfully, I felt.


Another popular trend, which I think works very well, is to use a book, either its cover or internal pages. Vintage books seem to work best, perhaps because of the texture they tend to have, and the contrast between that surface and the finish of the polished or highly-worked jewellery.

A jewellery box can be a wonderful prop, giving perhaps a vintage feel or a modern one. Make it clear in your description it’s not included in the price! And ensure it doesn’t detract from the jewellery by dominating the image. Chose large props with care.

Paying attention to the background is very important, whatever you decide to include in it. The background will always have an impact on the foreground. Either chose to make the background invisible (i.e. white), or decide on something bolder. But make the decision work for you by choosing carefully, and using with good lighting and deliberate focus on the jewellery itself.


Wood works (as a prop)


Sell your props!


Props don’t have to be purely aesthetic. Whilst it may be distracting and confusing to use other pieces of jewellery (although, for example, showing earrings that match a necklace, or vice versa, can be useful, especially if the other item is also for sale), as long as your prop enhances the overall image, then it can be interesting for the potential buyer to see, for example, the box that your jewellery will be packaged in. Including this as a prop to support your jewellery on, perhaps just in one of your photos, is a nice touch that inspires confidence in the overall buying experience.

Thanks for reading. Next time, I shall dwell a little longer on how to style jewellery, and will also look at where to find inspiration, and how to create a simple workflow to make photographing jewellery less time consuming.

~~~~

Do check out my other posts with ideas and hints on how to photograph jewellery -
Part One on cameras and close-ups
Part Two on focus and lighting
Part Four on styling and inspiration

Also, keep a look out for my forthcoming ebook covering in far more depth how to photograph handcrafted jewellery.

Friday 26 October 2012

Folksy Friday - Tick Tock

It's coming close to the end of October and it feel very autumnal and Hallowe-eny. Mists are descending and spider's webs appear while your back is turned. I even found a spider (sans web) in my car the other day, tucked happily behind the sun visor... You can imagine how much fun that was...

It's also the time of year in the UK when the clocks go back, causing general confusion but also a wonderful feeling on Sunday morning when you realise you can fairly claim an extra hour of sleep.


Driftwood Tide Clock by Seaside Stuff Vanity Fair Cover Clock by Ticking Image Oak and Metal Clock by Reclaimed Time Vinyl Record Horse Head Clock by Krissys Vinyl  Ceramic Clock by Bread and Butter Acrylic Fox Clock by Big Bad Wolf Design Driftwood Shelf Clock by Knottyburr Wood Crafts Maple Leaf Clock by Ode Oak Speech Bubble Clock by Aftertrees

In honour of the much-valued extra hour, I've collected together a few wonderful clocks from Folksy, any of which I'd love to own, provided they don't tick. I don't know if I'm alone in having a general loathing of ticking clocks and have even been driven to remove batteries in the past, just to get some relief from this strange ailment. So, to rephrase, I'd love any of the above clocks, as long as they tell me the time, but very, very quietly.

Click through on the clocks to go to their individual Folksy pages.

To all in the UK, enjoy that precious hour ...

Monday 22 October 2012

Copper in Autumn

Last weekend I spent a few hours with a friend in her workshop, tucked away against the chill weather outside, surrounded by silver, copper, polishers, rolling machines, and enough tools to make anyone who makes metal jewellery rather happy.


Copper ring, with a rolled pattern. Like a leopard's spots, or a honeycomb.

We chatted about the price of silver (slightly decreased), the fact I've most definitely missed the final posting date for the Diamond Jubilee hallmark (boo), and that assay offices will now hallmark silver and gold even if they're attached to metals such as copper, something they didn't previously do (interesting).


Another ring through the rolling mill. This time the pattern is more abstract.


We drank a lot of tea, finished off a jar of hot chocolate, and ate too many biscuits and chocolates (very naughty in a workshop, I know).

Oh, and we also made some jewellery.


More roller textured copper, a little crown-like...

Crown-like also, but in a slightly more-committed curvy-way.

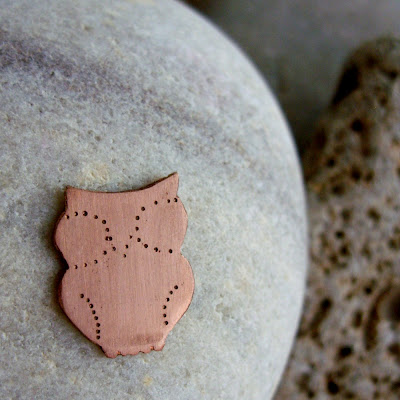
Unfortunately, I don't have any photos of the beautiful silver locket my friend finished, nor of the silver and copper owl she was working on, but I have included a few snaps of the four copper rings I made, and of the copper owl I did some work on (and no, we didn't converse beforehand, just coincidentally were both working on owls...), and which may well turn into a brooch. Or a pendant. Hmm...


The two crowns fit together, just, and make a wider ring.

Nothing I started is finished yet, the rings needing some more filing and polishing, and  the owl either needing more work on the detail, or me discarding it as a prototype or experiment.


A brooch in waiting. Or a pendant. Or just a copper owl.

But, still, not a bad way to spend a Saturday in autumn at all.

Wednesday 17 October 2012

How to Photograph Handmade Jewellery - part 2

In part 1 I wrote about some of the basics of photography and how important it was to take a variety of types of photos, with a variety of angles. This time, I'm going to deal with why focus and lighting are key to good photographs.


Sharp as a...


Macro and close-ups are all very well, but it is important that the end image is in sharp focus. Light has its part to play in this (see below) but also important is eliminating camera shake, and a small tripod can be useful to steady the camera. Another idea is to use the timer on the camera to take the photos - that way the camera itself won’t be jogged by your hand as you press the shutter down. Again, explore what your camera can do and experiment to see how it can help your final images.

Use the autofocus feature that comes as standard on many digital cameras - by holding down the shutter button very slightly, with the middle square of the viewing screen aligned with what you want to photograph, the camera should automatically provide the best focus for that image.  Be aware that backgrounds of a similar colour as the subject, such as in the photo below, can make it harder for the autofocus feature to find what you want it to focus on...


Three silver ladies

If your camera has manual focus then experiment with that, alongside the instruction manual, to work out the right settings for your photographs.


Shine your light


Good lighting is essential to good photos. The camera doesn't see what we do and small and subtle deficiencies in light and its quality can translate into dark and dingy photographs. Ensuring the camera not only has enough light but also the right type of light can help eliminate this issue.

And what is the right type of light? The right type of light is both bright and diffused.


Diffusion 


Diffused light is vital, even if you are taking photos in the daylight. Harsh, unfiltered sunlight creates strong shadows, and the high contrast between light and shade can diminish how well detail is displayed in the photograph by creating both overly bright and deeply shadowed areas.

Taking this photo in bright sunlight has created heavy shadows on much of the silver ring. 


Ideal weather conditions are a bright, but cloudy day. In conditions of bright sunlight, try taking photos on a window sill which the sun doesn’t reach but where the light bounces off walls, so the ambient light levels are high. This will mean you won't get strong shadows but your work will be well lit.

If the shadows created are still too strong then consider using masking tape to fix tracing paper to a window to diffuse the light. The strong sunlight will scatter evenly and the shadows cast will be diminished. However, the power of the light will still be bright enough to enable a good photograph to be taken.


By diffusing some of that sunlight, the balance of shadow and light is far less stark


Another alternative is to create a light tent using net curtaining, or some other fine material, stretched over a simple frame. This tent or box effect ensures strong and harsh light is softened and diffused as it passes through the material before it hits the jewellery. The Digital Photography School, Strobist, and Instructables all provide helpful tutorials through these links on how to build light tents.


Brightness 


A downside of diffusing light is that it can have the adverse effect of making the light conditions too dull. If this is the case then find a piece of white cardboard and angle it to reflect light onto the jewellery. Another option is to wear a white top which will bounce light back as you snap!

Ideally, avoid using a flash when photographing jewellery. Nothing beats daylight and a flash can create areas of over-bright light in a jewellery photo that don’t represent your work at its best and can distort its true colour. However, if you only have evenings to shoot in then use a piece of white cardboard or tissue over the flash, to help diffuse the harsh light.

All this can seem hard work but getting the lighting bright but gentle enough can make all the difference between an image that looks dull and even blurry, and a photo that is sharp, clear, and well lit, with all the focus on what it should be - the jewellery.


Light is everything


The single most important element in photography is light. Without light we have no photographic images, and this is true for both film and digital photography. This is a simple rule and keeping it in mind whenever you're taking photos of jewellery and all crafts will improve the final result.


Exceptions to rules...


However, as an aside to all this, shadows can be used to add drama and texture to a photo. So do experiment with using shadow in some of your images if you think it will add interest to the jewellery. If you are using several photos to show an individual piece of work, then including an adventurous image amongst the more traditional views may be an interesting addition.

For example, this photograph below, taken in sunlight, has strong shadows and areas of brightness


but I do like the sparkle of sunlight on the silver, and it helps convey how light moves through the gemstones. I also feel it gives a sense of movement in the earrings, and I love the shadows of the earrings in the background.

But this more correctly lit shot also helps convey the shine of the gemstones, something that doesn't come through in the first photograph. 


So I would be happy using them both to showcase these particular earrings.

Next time, I'll focus on the importance of location choice, themes and backgrounds.

Thanks for reading and I hope the article has been helpful.

~~~~

Do check out my other posts with ideas and hints on how to photograph jewellery -
Part One on cameras and close-ups
Part Three on location, themes and backgrounds
Part Four on styling and inspiration


Also, keep a look out for my forthcoming ebook covering in far more depth how to photograph handcrafted jewellery.